Instructional from Visual Gnome on Vimeo.
Wednesday, April 27, 2011
Way Back Wednesday
I guess you could say I've been at this for a while. Here's a peak into an audition for a cooking show that I did a few years ago. Happy Way Back Wednesday!
May 2-8 is National Cookie Week
Get those stories, recipes, blog posts, links and all things cookie up and out for all to see!!
I'll be running a contest for the special week so check back for more details.
For more info on National Cookie Week, check back here or check out one of the creators of this fun week, Michael, at his Food Blog He's the Gay Gourmet.
I'll be running a contest for the special week so check back for more details.
For more info on National Cookie Week, check back here or check out one of the creators of this fun week, Michael, at his Food Blog He's the Gay Gourmet.
Thursday, April 7, 2011
Garlic-Cheesy Artichokes
The answer to the Tuesday Tease... what flower is this??? ARTICHOKE!! This is a photo of the inside of the artichoke before I removed all of the petals and the fuzzy choke. Just beautiful, isn't it?
 I've been wanting to make whole artichokes for a while and finally the market had some beautiful ones. Not too big and not the miniature sort that has been growing in popularity.
Large glass or plastic bowl


 When you get to the top, cut at least 1.25" inches off the top layers that you can access. You
 open up the layers. Trim down the rest of the 1.25" now if you weren't able to before.
 Once all artichokes are prepped and in the water move on to the garlic.
 Mix the stuffing ingredients in a bowl. Rub or spray a little
 the center choke area, replacing to the pan as you fill them.
I've been wanting to make whole artichokes for a while and finally the market had some beautiful ones. Not too big and not the miniature sort that has been growing in popularity. I love the minis, but I feel like they take a lot longer to prepare enough to make a meal...and I knew I wouldn't have the time. Between looking for a job, working on ideas to create my own job and the house renovation, there's never a dull moment around here!
Many people find artichokes daunting. Between their compact layers and thorny tips, I can see why! Give yourself a little time, follow these easy steps and you'll be having creamy artichokes at the table in NO time!
Serves 2-4 (who am I to tell you that you can't eat two all by yourself?)
Ingredients:
4 artichokes fist size or a bit larger
1 lemon, cut in half
4 garlic cloves, skins off and whole
Olive oil
Stuffing:
3/4 cup panko bread crumbs
3/4 cup onion, finely chopped
3/4 cup panko bread crumbs
3/4 cup onion, finely chopped
1 tablespoon Parmesan cheese
1/4 t kosher salt
1 1/2 T unsalted butter, melted
4 garlic cloves used above, now chopped
1/2-3/4 cup shredded mozzarella cheese
1/2-3/4 cup shredded mozzarella cheese
additional lemon for serving (optional)
Large glass or plastic bowl
Large Frying Pan
Baking Dish
Fill your bowl with ice cold water and partially squeeze half of the lemon into the water, dropping entire half into the bowl. You will put the cut artichokes and stems in this water until you are ready to use them.
Peel back the lowest, outermost row of leaves until they snap. They may in fact snap off completely. If they are brown or unsightly, just cut them off. I start each round of leaves by peeling the first one or two back until it snaps. Then I take my scissors and cut each one off in that round at that height. Watch out for the thorny tips as you go.
NOTE: Be sure to rub the cut areas of the Artichoke with a half of a lemon as you go to keep it from both browning and staining your hands.
When you get to the top, cut at least 1.25" inches off the top layers that you can access. Youmay not easily be able to reach 1.25" of the top part which means it's time to whack it.
To reach the innermost layers, turn the artichoke upside down and give it a few
good head on whacks on the table (so that the top of the artichoke hits the table.) This will
open up the layers. Trim down the rest of the 1.25" now if you weren't able to before.As you open up the artichoke it will look like the flower photo at the top of this post. Pretty eh?
Cut the stem off the bottom and rub both the end and the bottom with the lemon. Cut the outer green layer and the white speckled layers off leaving the thin white core. Rub with lemon and drop into the lemony ice cold water.
At this point you can either dig and dig the layers out on the inside until you reach the hairy choke (which also needs to be removed) OR - my preference - cut the sucker in half lengthwise and have at it in a manor where you can see what you're doing! This recipe calls for them to be cut in half anyway, and if it's your first time cooking artichokes, it's easier to see their anatomy and understand just how much comes off from a cross-cut view.
Take a paring knife and cut out the layers on the inside right down under the short hairy choke, but NO FURTHER. Beneath the choke is the heart that will become so creamy after it's cooked. Be sure to continue to rub the cut surfaces with lemon. If you've chosen to leave the artichoke whole, you may need to cut the lemon into quarters to get it down in the cavity.
Once all artichokes are prepped and in the water move on to the garlic.You'll need a minimum of 4 whole cloves, although I could say use up to 6 or 8 if you like it really garlicky like I do. Add 2 tablespoons of olive oil to a hot wide bottomed pan. Cut the cloves in half and cook them until one side is slightly browned. This will begin to cook the garlic while flavoring the oil. Remove the cloves and set them aside.
Preheat oven to 375°F.
Add the artichokes in a single layer and cook them on VERY high heat to brown and blister the chokes. Turn the chokes as they are browned. Add the stems and brown them too. Don't take them out too early. Browning like this adds a smoky and rich flavor. It's worth the added few minutes.
Mix the stuffing ingredients in a bowl. Rub or spray a little olive oil onto the bottom of the baking dish and using tongs
or two spoons, move the artichoke halves to your baking dish. Arrange so that they evenly face up. I arrange them in the baking dish before I stuff them.
Remove one half at a time, pushing stuffing into the layers and into
the center choke area, replacing to the pan as you fill them. Sprinkle any remaining stuffing over the top of the dish if you have any stuffing left.
Bake for 45 minutes at 375F.
You can either serve in the baking dish or on plates as shown to the right.
Tuesday, April 5, 2011
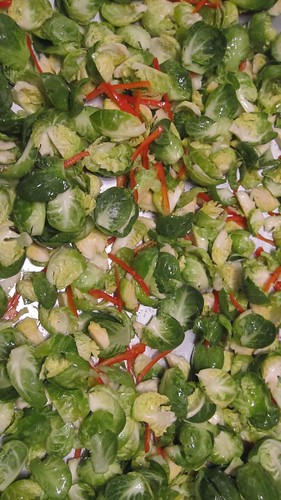
Baked Brussel Sprouts with Sriracha and Honey Sauce

As a child my mother would utter the words brussel sprouts and a sense of horror would take me over. What I knew of as brussel sprouts then (boiled to death then topped with butter - ewe) and how I think of them now are vastly different.
This is my new favorite brussel sprout recipe. It. Is. Awesome.
I cannot take credit for developing the sauce as I found the original recipe at Food52. Upon reading it I knew it would be WONDERFUL. I did have one worry though. I've been trying to NOT deep fry things (I've been losing weight thank you very much!) So I decided to bake them.
Here's what I did.
Serves 4-6
Printable version of Recipe
Ingredients:
1lb of brussel sprouts
1 red bell pepper cut into long toothpick slices
olive oil
large flake kosher salt
Spicy sauce:
1/2 Tablespoon Sriracha hot sauce
1.5 Tablespoons of honey, heated
juice of 1/2 a lime
zest for half a lime
Preheat oven to 400°F.
Cut the bottom hard portion off of the brussel sprouts.
Cut the sprout in half lengthwise and if large cut into quarters. I like to cut the hard center of the sprout out as well. (You don't HAVE to.) I then peeled the leaves to the heart and I left the heart in tact, tossing all together in a large bowl. This takes a while. You may want to wait to turn the oven on until you're halfway through preparing the sprouts.
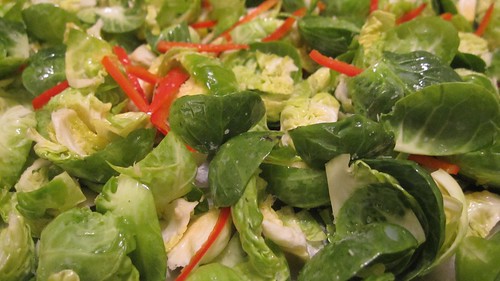
Add the red pepper slices. I drizzled the olive oil, a little at a time, tossing the bowl contents until everything has a thin coating. I leaned on the side of less than more as you can see in the photo to the right. They aren't drenched. There was no olive oil running off the brussel sprouts into the jelly road pan. Sprinkle the kosher salt flakes over the pan.
Bake for 15 minutes. If you bake them longer then will dry out and crisp up, but I liked them at the 15 minute mark.
Mix the remaining ingredients in a bowl and set aside. Note: I heated my honey so that it was runny and it mixed together easier.
Once the sprouts are cooked, pour them into a large bowl. Pour the sauce over them, a little at a time and serve. Be prepared to hear yummy noises from around the table.
Today as I began to write this post, I read the comments on the post at Food52 and in the comments she posted this link for another version of the baked idea from
Brooklyn Bread Press.
Printable version of Recipe
Tuesday Tease

Take a good look at the photo above.
Any idea what flower this is?
Here are some hints...
* rich in vitamin C
* rich in vitamin K (potassium)
* rich in folic acid & magnesium
* low in calories
* naturally fat free
* a serving has approximately one fourth of an adult's daily fiber needs
Think you know? Drop a comment below!
Give up? Tune in Thursday for the answer and a tasty recipe!!
Subscribe to:
Posts (Atom)